Race & Place: African Americans in Washington, D.C. from 1800 to 1954

Description

This workshop will investigate "four crucial periods of African-American history -- slavery, emancipation, reconstruction, and segregation -- through the lens of the experiences of African Americans in the District of Columbia." Specific topics will include "The Landscape of Urban Enslavement," "Resistance to Slavery in the Nation’s Capital," "Emancipation and Civil War Washington, "Institutions of Reconstruction: The Freedman’s Bureau and the Freedman’s Savings and Trust Company," "Frederick Douglass and the Politics of Reconstruction, "Community, Activism, and Desegregation: 1900-1954," to be explored through visits to historic landmarks, lectures, teaching resource sessions, and curriculum project development.

Contact name
Queeny, Hart
Contact email
Registration Deadline
Sponsoring Organization
National Endowment for the Humanities
Phone number
1 202-842-0920
Target Audience
Kindergarten through Twelfth Grade
Start Date
Contact Title
Operations Managaer
Duration
Six days
End Date

The Stanford Program on International and Cross-Cultural Education (SPICE)

Teaser

SPICE is non-profit and develops multidisciplinary curriculum materials on international themes for elementary, middle school, and secondary students.

Description

<p>SPICE is non-profit and develops multidisciplinary curriculum materials on international themes for elementary, middle school, and secondary students.</p>

<p>SPICE units include thorough lesson plans with subject overviews, primary source materials, handouts, worksheets, in-class activities, projects, and assignments. Many units are interdisciplinary.</p>

<p>While SPICE curricular materials focus primarily on international issues, a number of curricular units are appropriate for an American history course. Selected titles include: Diamonds in the Rough: Baseball and Japanese-American Internment; Security, Civil Liberties, and Terrorism; Comparative Health Care: The United States and Japan; Introduction to Diasporas in the United States; San Francisco Peace Treaty: The Cold War and the Peace Process; and, U.S.-Mexico Economic Interdependence: Perspectives from Both Sides of the Border. </p>

<p>Only the tables of contents for units are available online, though titles may be ordered through the SPICE website.</p>

Publisher
Stanford University

Illinois Law-related Education Conference

Description

From the Constitutional Rights Foundation Chicago website:

"CRFC's annual conference features over 20 teacher workshops on legal and political issues, interactive teaching methods, and innovative materials for the classroom. Participants can attend dynamic workshops featuring nationally recognized presenters, exchange ideas with colleagues from throughout the state, and take back free resource materials."

Sponsoring Organization
Constitutional Rights Foundation Chicago
Contact email
Location
Oak Brook, IL
Contact name
Margie Chan
Phone number
800-801-9933
Start Date
Registration Deadline

The Struggle for Time: Using Persuasive Essays to Teach Elementary History

Image
For more information

This is just a slice of a much broader work entitled, Freedom to Express: Promoting Civic Literacy, Reading, and Writing for the English Language Learner. This curriculum uses the First Amendment, namely, Freedom of Expression, as a frame of reference to launch and systematically teach ELLs how to successfully write a persuasive essay. To secure a copy please contact Michelle Herzog at Herczog_Michelle at lacoe dot edu.

Educators are all too familiar with the unfortunate truth that what is tested drives a teacher’s instructional focus, energy, and time. Unfortunately, because history/social studies is not a formally tested subject in elementary schools in many states it frequently becomes the neglected subject. Additionally, with little to no sense of urgency to teach history thoroughly, it is easy to rely on “sound bite” instruction rather than quality, in-depth teaching. It can be a constant challenge for elementary educators to designate significant amounts of time for social studies instruction.

Crop It

Image
Article Body
What is it?

Crop It is a four-step hands-on learning routine where teachers pose questions and students use paper cropping tools to deeply explore a visual primary source.

Rationale

In our fast-paced daily activities we make sense of thousands of images in just a short glance. Crop It slows the sense-making process down to provide time for students to think. It gives them a way to seek evidence, multiple viewpoints, and a deeper, more detailed, understanding before determining the meaning of a primary source.

Description

This routine helps young students look carefully at a primary source to focus on details and visual information and use these to generate and support ideas. Students use evidence from their “crops” to build an interpretation or make a claim. Crop It can be completed as part of a lesson, and can be used with different kinds of visual sources (for example cropping a work of art, a poem, or a page from a textbook).

Teacher Preparation
  1. Print a collection of primary sources related to the unit or topic under study. The collection may include:
      • various types of sources that include images, such as photographs, cartoons, advertisements, and newspaper articles. Consider images that challenge students to use varying amounts of background knowledge and vocabulary, or that can be read by students working on different reading levels;
      • sources representing different perspectives on the topic;
      • sources depicting the people, places, and events that will be tested in a unit;
      • sources representing perspectives that are missing from the textbook’s account.
  2. Print enough copies so each student can have one source: it’s fine if some students have the same image.
  3. Print and cut out enough Crop It tools so that each student has a set of two tools.
  4. Prepare to display a series of questions either through a PowerPoint presentation or on chart paper.
In the Classroom

Step One: Choose an Image

Ask students to choose a source from the collection that either:

    • connects to an experience that you have had;
    • relates to something that you know a lot about, and/or
    • leaves you with questions.

*Note: other criteria may be substituted such as choose an image that relates to a question you have about the unit, relates to your favorite part of this unit, or that represents the most important topic or idea of this unit.

Step Two: Explore the Image

Crop the image to the part that first caught your eye. Think: Why did you notice this part? Crop to show who or what this image is about. Think: Why is this person or thing important? Crop to a clue that shows where this takes place. Think: What has happened at this place?

  1. Pass out a set of two Crop It tools to each student. Demonstrate how to use the Crop It tools to focus on a particular piece of a source. Students can make various sizes of triangles, rectangles, and lines to “crop” or focus attention on an important part of the source.
  2. Invite students to carefully explore their image by using the tools. Pose a question and ask students to look carefully and “crop” to an answer. For example, ask students to:
  3. (See Question Sets Handout for additional sample questions.) Invite students to revise their answer by choosing another crop that could answer the same question. Encourage students to consider: if they could only have one answer, then which crop would be best? Why? Allow students to look at the crops of other students. Students can explain their crop to a partner. Or ask students to place their source and crop on their desk, and invite students to silently walk around and notice the different types of evidence that students used to answer the same question.

Step Three: Identify the Evidence

Collect the types of evidence students cropped on large chart paper by asking them to recall the different types of details that they cropped. These charts encourage students to notice details and can be used later, when adding descriptions to writing or as supports for answers during class discussions. The charts might look like the example below and will constantly grow as students discover how details help them build meaning. Chart

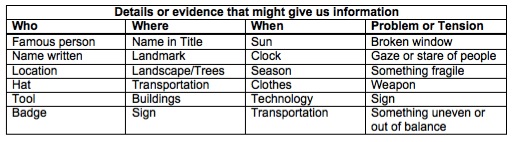
Step Four: Close the Lesson

Conclude the lesson by asking students what they learned about the topic related to the collection. Ask them to reflect on what they learned about looking at sources, and when in their life they might use the Crop It routine to understand something.

Common Pitfalls

Avoid asking too many questions during Step Two: Explore. Keep the questions and the cropping moving fairly quickly so students stay engaged and focused on their primary source. To increase the amount of thinking for everyone, don’t allow students to share their own crops with a partner or the class right away. Ask students to revise their own crop by trying different ideas before sharing.

Example

See Image Set Handout for samples that you might use with this strategy. These images represent some events key to understanding the Great Depression of the 1930s (e.g., FDR’s inauguration and the Bonus Army’s march on Washington) and could be used to review or preview a unit of study.

For more information

Finding Collections of Primary Sources to Crop

Find Primary Source Sets at the Library of Congress.

See this entry on finding primary sources or search Website Reviews to find useful sources.

Other Resources

Visible Thinking, Project Zero, Harvard Graduate School of Education.

Artful Thinking, Project Zero, Harvard Graduate School of Education.

Richhart, R., Palmer, P., Church, M., & S. Tishman. (April 2006). Thinking Routines: Establishing Patterns in the Thinking Classroom. Paper prepared for the American Educational Research Association.

Bibliography

Crop It was developed by Rhonda Bondie through the Library of Congress Teaching with Primary Sources Northern Virginia.

My Piece of History

Teaser

Even the recent past was very different from the present. Students analyze photos from the 1960s and 1970s to identify differences between then and now.

lesson_image
Description

Students analyze two pictures from the mid to late 20th century—a recreation room, and a set of wedding gifts—and use objects in the picture to identify differences between the past and the present.

Article Body

This lesson uses everyday objects from the past to facilitate the development of two foundational historical thinking skills for young students:

  1. understanding that people of the past lived differently than we do today and;
  2. that history consists of stories constructed from artifacts left from the past.

The lesson begins with the teacher introducing an object from his or her own past that is unfamiliar to students, and a discussion of what that object’s purpose might have been. Then, students observe photographs of everyday items from the 1960s and 1970s to identify both familiar and unfamiliar objects.

Activities 2 and 3 focus on students acting as “historical detectives,” as they generate hypotheses for the purposes of unfamiliar objects in the pictures, and then brainstorm methods for verifying these hypotheses—including interviewing older family members for additional information. Finally, students construct their own historical narratives about an object by creating a museum label for that object. In activity 4, students repeat the process using an object found in their own home.

This lesson walks students through the steps of historical inquiry and introduces them to key historical concepts (historical context and evidence) in an engaging and age-appropriate way.

Topic
Daily life; popular culture and leisure
Time Estimate
2-3 Class Sessions
flexibility_scale
4
Rubric_Content_Accurate_Scholarship

Yes

Rubric_Content_Historical_Background

Yes
Several other museum exhibits from the mid to late 20th century are available here, and may be useful for augmenting the lesson as well as providing background for teachers.

Rubric_Content_Read_Write

Yes
While no reading of text is required, students write during the interview process, as well as in the final activity, creating museum labels.

Rubric_Analytical_Construct_Interpretations

Yes
This is the central feature of the lesson.

Rubric_Analytical_Close_Reading_Sourcing

No
While no reading is required, close analysis of the photographs and attention to time period is necessary.

Rubric_Scaffolding_Appropriate

Yes

Rubric_Scaffolding_Supports_Historical_Thinking

Yes
Discussion questions are provided to help students analyze unfamiliar objects, as well as a chart for students to organize information gained from interviewing older family members about “mystery objects.”

Rubric_Structure_Assessment

No
While no specific assessment or criteria is provided, the final activity allows students to engage in the inquiry process independently, and may be used to assess student understanding.

Rubric_Structure_Realistic

Yes

Rubric_Structure_Learning_Goals

Yes

Learning Menus: Textbooks a la Carte

field_image
Article Body
Why do it?

Elementary and middle school classrooms often require students to read history textbooks. Historical accounts in textbooks, however, can often be dry or difficult to grasp. Learning Menus offer students a variety of active methods to access the textbook, remember pertinent information, and learn to regulate their own learning. This strategy can be adapted for multiple grade levels.

What is it?

Learning Menus are forms of differentiated learning that give students a choice in how they learn. Each choice on the Menu encourages students to engage in an activity that requires actively reading, re-reading, and then summarizing important textbook content. After a student has completed an activity on the Menu, the teacher immediately assesses his or her work before she or he can move on. Learning Menus come in various forms and can include tic-tac-toe boards, restaurant-like menus, matrices, and multiple-choice grids. For example, students can be given a Learning Menu structured like that of a dinner menu with the headings “Appetizer,” “Entrée,” and “Dessert” and be instructed to follow the order of the menu just as they would in a restaurant. Within each “course” students choose from a list of activities. The assignment sheet includes a Well-defined Description for how to complete a chosen activity, the Possible Points one can earn for it, and the textbook Section it covers. At least one task must be completed for each book section, although students are always free to choose their own tasks from the menu choices. After the completion of each “course,” the teacher assesses the result in Points Earned before the student moves to the next one. In the dinner menu example, “Appetizer” activities focus on summarizing the overall content in each section of the textbook reading with activity choices like “Flash Cards,” “Outline,” and “Summary.” “Entrée” activities center on a closer reading of details and give students an opportunity to be creative with options like make a website or travel brochure. For “Dessert” students must choose a short activity that provides an overall summary of the most important themes found in the entire textbook reading.

Example

For an example of a Learning Menu in action, see the video Differentiating with Learning Menus on the Teaching Channel website. In this video, Mary Vagenas uses a “dinner menu” strategy with her 7th-grade social studies students at the Queens School of Inquiry in Flushing, NY. Below the video and in the right-hand column under “Supporting Materials” one can find a sample Learning Menu and a full transcript of the video in Word (DOC) format.

Why is this a best practice?

Learning Menus are a method of differentiating instruction that provides flexible ways to engage students, and that can be adapted to various classroom environments. Students become familiar with different types of study methods that they can use to self-regulate learning in the future. Tasks can include simpler activities for struggling students and more complex activities to challenge advanced students. Continual assessment and feedback can help ensure that each student makes progress towards the learning goals. Learning Menus also liven up textbook reading activities by giving students choices about how to extract essential information. These choices can help motivate reluctant readers. However, no matter what a student chooses from the menu, he or she engages in actively reading and making sense of textbook content, helping build historical knowledge.

For more information

See more on this topic elsewhere on Teachinghistory.org.

Graphic organizers are another strategy for scaffolding and breaking down challenging texts. Learn more about them, and consider including them in Learning Menus.

Also see the Institutes on Academic Diversity (IAD) at the University of Virginia's Curry School of Education.

Tenement Life

Teaser

Students examine primary sources related to the life of an immigrant girl and her family to discover what life might have been like at the turn of the century.

lesson_image
Description

Students examine a set of primary source documents related to the life of an immigrant girl in order to investigate what life might have been like at the turn of the century.

Article Body

The Tenement Museum website provides engaging and entertaining ways to introduce young students to primary sources. The “Elementary School Lesson” found under “Primary Source Activities” uses a family photo, a postcard, a report card, and a passport to examine the life of Victoria Confino, an immigrant girl at the turn of the 20th century. Because these sources are mostly visual, they allow easier access for young students and English language learners than text-dense sources. The lesson provides useful guiding questions for the teacher when helping students examine the documents. After students have discussed the sources, they are asked to write a paragraph about Victoria’s life.

The Tenement Museum website also includes a variety of other fun and educational activities for students. Students can play the immigration game in which they figure out how to get to America, or complete a virtual tour of a tenement building. They could also mix a folk song or, for older students, explore the webcomics of a modern immigrant.

Topic
Immigration
Time Estimate
1 Class Session
flexibility_scale
4
Rubric_Content_Accurate_Scholarship

Yes

Rubric_Content_Historical_Background

No

Rubric_Content_Read_Write

Yes
Students “read” visual sources that contain minimal text. They write about the life of an immigrant girl using evidence from these sources.

Rubric_Analytical_Construct_Interpretations

Yes

Rubric_Analytical_Close_Reading_Sourcing

Yes
The lesson includes questions to prompt students to look at specific details in the documents, but teachers need to add questions about the origins of the documents.

Rubric_Scaffolding_Appropriate

Yes

Rubric_Scaffolding_Supports_Historical_Thinking

Yes
Suggested questions are provided for each source. The teacher could use the questions to develop a graphic organizer.

Rubric_Structure_Assessment

Yes
Students are asked to write about Victoria’s life using the historical evidence. There are no assessment criteria included and teachers will need to develop their own.

Rubric_Structure_Realistic

Yes

Rubric_Structure_Learning_Goals

Yes

Surfing the Web Successfully

Image
Question

How can I most effectively search for and then bookmark sites to use with my intermediate elementary students within the time constraints of my day? I need exciting, engaging resources to extend and enrich learning opportunities that will teach my students to view information like a historian.

Answer

It can be very frustrating spending time on search tools and not finding what you need. The good news is that major search tools such as Google, Bing, and Yahoo provide a variety of built-in search strategies that can assist in your search. These strategies deliver quality results while saving you time. There is also an assortment of online tools that provide ways for teachers to bookmark and share resources with their students.

Search Strategies

Suggestion One: Exact Phrase The first strategy that all teachers should be using is the Exact Phrase option allowed by all major search tools. For example, you may have tried searching for Civil War resources by simply typing the word "civil" and the word "war" into a Google search box. This search returns more than 184,000,000 results. This is because Google will return results for every website that has the word “civil” and the word “war.” You can force Google and other search tools to be more specific by enclosing phrases like Civil War inside quotation marks such as:

“civil war”

This forces the search tool to look for that specific phrase. You can include multiple words inside the quotation marks and include more than one set of phrases in your search. You might try this:

“American civil war” “lesson plan” “middle school” “primary source”

This revised search returns 25,000 results—all immediately useful. Suggestion Two: Limiting Search Here’s another shortcut. A simple search for “civil war” might include results for both American and British Civil Wars. To remove results about the British version, include the word British in your search but place a minus sign just before the word. This tells the search tool to “show me sites about the American Civil War but eliminate results containing the word 'British'.” It would look like this:

“civil war” –british

Suggestion Three: Title Search Another easy way to increase your chances of finding quality resources is to search only the titles of websites rather than the text of sites. This strategy is much like a traditional card catalog library search. If a book is titled The American Civil War, you can be sure that the content within that book will be useful. Do the same sort of search online by embedding the title qualifier into the search box along with your keywords. For Bing and Yahoo, the qualifier will look like this:

title:”civil war”

For Google, the qualifier is a bit different:

intitle:”civil war”

Your results will include just those websites that have the phrase “civil war” in the title of the site. By using words and punctuation that remove useless information, you can find exactly what you need and do it in a timely way.

Online Bookmarking Tools

There are many tools that can help you store and share resources that you find online. Three used by educators:

  1. Diigo: Diigo stores sites that you find online into a password-protected free account that you can access anywhere, anytime. With Diigo, you can create folders for your favorites as well as “tag” each favorite. This makes it easy to find sites that are saved. This “tagging” system also makes it easy for you to share sites with your students. Here's an example of Diigo resources tagged as “civil war.”
  2. LiveBinders: LiveBinders is similar to Diigo. After creating your free account, you create the online equivalent of a 3-ring binder with tabs that hold your favorite websites. These binders can then be shared with your students via a specific URL. The beauty of LiveBinders is that each of the websites will open within the LiveBinder page so that your students travel only to the sites you share. An example of a Civil War LiveBinder can be found here.
For more information

Check out these links for guides and tips to using several search engines:

And take a look at our Tech for Teachers on search engines for links to more strategies.

Google Forms

Image
What is it?

The Google suite of tools holds a number of free educational goldmines. In my classroom practice, Google Forms has become an indispensible tool for curricular application, classroom management, and work flow assistance. A form can be created, customized, and shared with students quickly and easily.

Getting Started

If you do not have an account with Google, you will need to register to set up a free account.

  1. Once you are logged into Google, click on “Docs.”
  2. Click on “Create New → Form”
  3. Enter the questions you would like to have answered. You can choose to collect information in multiple formats: text, paragraph text, multiple choice, checkboxes, select from a list, scale, or grid.
  4. For each new item, click “Add Item” at the top left.
  5. In addition, you can select a theme from a plethora of options.
  6. When you have finished the form, copy and paste the link found at the bottom of the page.

The responses will populate a corresponding spreadsheet in your Google Docs list and can then be sorted by question. A form can be used to simplify and coordinate basically any function where you need to collect student responses or information. The customizable backgrounds and range of question types allow for personalization of the forms. I am discovering new and interesting ways to use forms all the time in my classroom, and it has become a tool that I implement frequently.

Examples

At the beginning of the school year I use a Google Form to collect contact information for the students, including book numbers, email addresses, and parent names. The answers are then always accessible online whether I am at home or at school. We even created a contact form for the staff.

A second instance where I use Google Forms in the classroom is for self-assessment. During American Government, we completed a project called Story of a Bill. At the end of the project, I needed to find a quick way to collect the student assessment of their work. The form proved to be a quick and efficient manner of completing that goal.

For an advanced challenge, many teachers are using Google Forms to set up self-grading quizzes. Although I do not use this function in my classroom practice, there are a number of teachers who are finding it quite useful. For good resources and templates for the quiz function, visit Kern Kelly’s page from the Google Teacher Academy. Scroll down to the screencast and then the section on Form Templates.

For more information

If Google Forms isn't enough for you, check out our entry on Survey Monkey, another online tool for creating and administering forms and surveys.
10 minute video of how Google Apps work for the K-12 classroom.