Alabama: Prekindergarten Standards
Article Body
- Standard: The state of Alabama does not have PreKindergarten standards for this subject.

Crop It is a four-step hands-on learning routine where teachers pose questions and students use paper cropping tools to deeply explore a visual primary source.
In our fast-paced daily activities we make sense of thousands of images in just a short glance. Crop It slows the sense-making process down to provide time for students to think. It gives them a way to seek evidence, multiple viewpoints, and a deeper, more detailed, understanding before determining the meaning of a primary source.
This routine helps young students look carefully at a primary source to focus on details and visual information and use these to generate and support ideas. Students use evidence from their “crops” to build an interpretation or make a claim. Crop It can be completed as part of a lesson, and can be used with different kinds of visual sources (for example cropping a work of art, a poem, or a page from a textbook).
Ask students to choose a source from the collection that either:
*Note: other criteria may be substituted such as choose an image that relates to a question you have about the unit, relates to your favorite part of this unit, or that represents the most important topic or idea of this unit.
Crop the image to the part that first caught your eye. Think: Why did you notice this part? Crop to show who or what this image is about. Think: Why is this person or thing important? Crop to a clue that shows where this takes place. Think: What has happened at this place?
Collect the types of evidence students cropped on large chart paper by asking them to recall the different types of details that they cropped. These charts encourage students to notice details and can be used later, when adding descriptions to writing or as supports for answers during class discussions. The charts might look like the example below and will constantly grow as students discover how details help them build meaning. 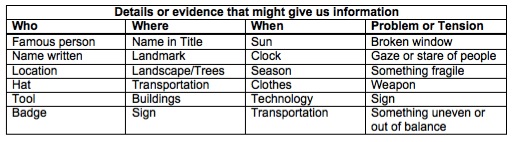
Conclude the lesson by asking students what they learned about the topic related to the collection. Ask them to reflect on what they learned about looking at sources, and when in their life they might use the Crop It routine to understand something.
Avoid asking too many questions during Step Two: Explore. Keep the questions and the cropping moving fairly quickly so students stay engaged and focused on their primary source. To increase the amount of thinking for everyone, don’t allow students to share their own crops with a partner or the class right away. Ask students to revise their own crop by trying different ideas before sharing.
See Image Set Handout for samples that you might use with this strategy. These images represent some events key to understanding the Great Depression of the 1930s (e.g., FDR’s inauguration and the Bonus Army’s march on Washington) and could be used to review or preview a unit of study.
Finding Collections of Primary Sources to Crop
Find Primary Source Sets at the Library of Congress.
See this entry on finding primary sources or search Website Reviews to find useful sources.
Other Resources
Visible Thinking, Project Zero, Harvard Graduate School of Education.
Artful Thinking, Project Zero, Harvard Graduate School of Education.
Richhart, R., Palmer, P., Church, M., & S. Tishman. (April 2006). Thinking Routines: Establishing Patterns in the Thinking Classroom. Paper prepared for the American Educational Research Association.
Crop It was developed by Rhonda Bondie through the Library of Congress Teaching with Primary Sources Northern Virginia.

Elementary and middle school classrooms often require students to read history textbooks. Historical accounts in textbooks, however, can often be dry or difficult to grasp. Learning Menus offer students a variety of active methods to access the textbook, remember pertinent information, and learn to regulate their own learning. This strategy can be adapted for multiple grade levels.
Learning Menus are forms of differentiated learning that give students a choice in how they learn. Each choice on the Menu encourages students to engage in an activity that requires actively reading, re-reading, and then summarizing important textbook content. After a student has completed an activity on the Menu, the teacher immediately assesses his or her work before she or he can move on. Learning Menus come in various forms and can include tic-tac-toe boards, restaurant-like menus, matrices, and multiple-choice grids. For example, students can be given a Learning Menu structured like that of a dinner menu with the headings “Appetizer,” “Entrée,” and “Dessert” and be instructed to follow the order of the menu just as they would in a restaurant. Within each “course” students choose from a list of activities. The assignment sheet includes a Well-defined Description for how to complete a chosen activity, the Possible Points one can earn for it, and the textbook Section it covers. At least one task must be completed for each book section, although students are always free to choose their own tasks from the menu choices. After the completion of each “course,” the teacher assesses the result in Points Earned before the student moves to the next one. In the dinner menu example, “Appetizer” activities focus on summarizing the overall content in each section of the textbook reading with activity choices like “Flash Cards,” “Outline,” and “Summary.” “Entrée” activities center on a closer reading of details and give students an opportunity to be creative with options like make a website or travel brochure. For “Dessert” students must choose a short activity that provides an overall summary of the most important themes found in the entire textbook reading.
For an example of a Learning Menu in action, see the video Differentiating with Learning Menus on the Teaching Channel website. In this video, Mary Vagenas uses a “dinner menu” strategy with her 7th-grade social studies students at the Queens School of Inquiry in Flushing, NY. Below the video and in the right-hand column under “Supporting Materials” one can find a sample Learning Menu and a full transcript of the video in Word (DOC) format.
Learning Menus are a method of differentiating instruction that provides flexible ways to engage students, and that can be adapted to various classroom environments. Students become familiar with different types of study methods that they can use to self-regulate learning in the future. Tasks can include simpler activities for struggling students and more complex activities to challenge advanced students. Continual assessment and feedback can help ensure that each student makes progress towards the learning goals. Learning Menus also liven up textbook reading activities by giving students choices about how to extract essential information. These choices can help motivate reluctant readers. However, no matter what a student chooses from the menu, he or she engages in actively reading and making sense of textbook content, helping build historical knowledge.
See more on this topic elsewhere on Teachinghistory.org.
Graphic organizers are another strategy for scaffolding and breaking down challenging texts. Learn more about them, and consider including them in Learning Menus.
Also see the Institutes on Academic Diversity (IAD) at the University of Virginia's Curry School of Education.