Joe Jelen on Document Cameras
Date Published
Image
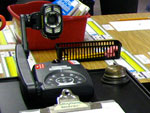
Photo, Lumens Desktop Document Camera, June 19, 2007, AV-1, Flickr
Article Body
What is a Document Camera?

A document camera makes a great addition to a history classroom with a video projector or TV. A document camera captures anything under its lens and projects it on the screen. While this technology has been around for a few years, I have noticed it has been a little slow to catch on for a variety of reasons.

Some teachers may be hesitant to embrace the document camera because they believe it to simply be a glorified overhead projector. The document camera beats the old overhead projector in many ways, the first being that the document camera does not require one to make transparencies. A teacher can project artifacts, photos, worksheets, and anything else that can fit under the camera lens. In addition, students are better able to see the image produced by a document camera as it is much brighter and clearer than the image produced by the overhead projector. Best of all, you no longer leave school covered in overhead marker!

How Can I Afford One?

The cost of the document camera may also make this teaching tool seem out of the reach of many teachers and districts in these lean budget years.

It is also possible to obtain grant money for document cameras from places like DonorsChoose.

While document cameras range in price from $200 to $2,000, this should not preclude one from having their own document camera. You can find a used document camera on eBay or a surplus property store for under $100. I bought mine at one such surplus property store, associated with the
University of Maryland, for $25. Another option is to make a document camera yourself using a webcam and available USB port. The only drawback to this setup is you have to be able to load software on your computer attached to the video projector in your classroom. A ready-made version of this runs about $69. It is also possible to obtain grant money for document cameras from places like DonorsChoose.

How Do I Set It Up?

Once you have your document camera installation is straightforward. Some document cameras come with a freeze image button which is a great feature to capture a page in a book or map that might be difficult to hold in place. If the document camera does not have this feature, you can hook up the document camera directly to the video projector, which often has the ability to freeze an image. If your document camera is not one that hooks up to your computer via USB, you can also set up the document camera directly to your projector. This allows you to toggle between the image on your computer screen (assuming it too is attached to your video projector) and the image from your document camera. You can also connect most document cameras to a television using an S-video cable or component video cable. It should be noted, however, that the clarity is not as crisp when using the S-video cable or component video cable compared to using a VGA or DVI connection.

How Can I Use It?

The document camera has vast instructional possibilities. I have used my document camera every day in my history classroom. One of the benefits of having a document camera in a history classroom is having the ability to analyze primary sources together as a class. I am able to zoom in on important components of a photograph or text and can invite students to the document camera to annotate pictures or text without bulky markers or transparencies. I am also able to share maps in books easily with students, in color. Students are able to share work they have created immediately with the class without having to scan an image or make a transparency of the document.

My favorite use of the document camera is allowing me to spotlight and share exemplar student work.

This means that jigsaw activities work very efficiently, with each group able to share what they have written on nothing larger than a worksheet. Collectively, classes have created essay outlines and timelines together. The document camera allows students to share storybooks they have created, projected large enough for the class to see. From a classroom management perspective, the document camera allows me to easily show students the worksheet we are working on or the question I want them to focus on. I am also able to place my stopwatch under the camera to show students how much longer they have to complete a task. Finally, my favorite use of the document camera is allowing me to spotlight and share exemplar student work. I am able to give specific praise to a well-written essay or project.

I hope you are able to get your hands on a document camera and share your tips and tricks with others. You can find product reviews for document cameras in this article from Scholastic.

For more information

Looking for more suggestions for creative overhead, smartboard, or document camera activities? Jelen demonstrates a technique for introducing students to visual primary sources in our video "Zoom-in Inquiry".

From MP3 players to Skype, our Tech for Teachers section examines other tools appropriate for classroom use.
National Archives Launches DocsTeach

Date Published
Image
Detail, DocsTeach
Article Body

With the National Archive's DocsTeach, educators can find primary sources and the tools to present and interpret them on the same website.

Officially launched September 20, DocsTeach brings more than 3,000 primary sources together with seven online activities, each designed to reinforce specific classroom skills. Register for free, and log in to browse or search the site's photographs, speeches, letters, drawings, memos, video clips, maps, and other sources, dating from 1754 to the present day. Bookmark those that interest you, and head over to the site's "Activities" section.

Here, you can incorporate your chosen sources into online activities adaptable to students at all grade levels. Save activities to access later—including in the classroom.

Activities include:

  • Find a Sequence: Have students arrange primary sources in a particular order. DocsTeach suggests using this activity to prompt students to determine the chronological order of sources, or to order steps in a process (for instance, which documents represent which steps in the veto process? In the drafting of the U.S. Constitution?).
  • Focusing on Details: Use five different tools to focus student attention on specific sections of a primary source. Do you want your students to focus on a certain facial expression before being distracted by the rest of a photograph? Use "Zoom/Crop,” "Spotlight," or "White Out/Black Out." How about removing a few key words from a document and having students determine, from the context, what they might be? Or pointing out the date and other contextualizing evidence in a handwritten letter?
  • Making Connections: Arrange primary sources in a particular order, and have students write arguments for why one source leads to another. Choose sources that lead up to a major historical event—a telegram on the shelling of Fort Sumter might lead to Abraham Lincoln's suspension of the writ of habeas corpus, for instance. Or maybe your sources are thematically related—a 1918 poster using a woman in uniform to recruit male Marines leads to a 1942 WACC recruitment brochure leads to a 1990 poster calling women to join the U.S. Army
  • Seeing the Big Picture: Match primary sources in related pairs. As students successfully make the matches, they reveal pieces of a larger picture. How do the matched pairs relate to, say, the image of the Declaration of Independence or the 19th Amendment?
  • Interpreting Data: Call out particular data points on primary sources incorporating charts and graphs, and embed comments and questions in the source. Guide how students react to the data they see and lead them to ask who gathered it, how they gathered it, and why.
  • Mapping History: Use a modern or historical map as a background, and have students place sources in the location they come from or relate to. Where do sources locate New Deal projects? Major battles of the Civil War? Protest marches throughout U.S. history?
  • Weighing the Evidence: Present students with primary sources on a particular historical issue, and have them decide whether they support one interpretation or another. Try the causes of the Civil War. Which documents support an economic cause? Which support slavery as a dividing issue?

Write introductions and conclusions to any activity, and publish them to share with other DocsTeach users, if you choose. Or check out the National Archives' sample activities.

At present, only 28 pre-made activities are available, but check back as more users register at the site and share their work.

For more information

Read more about DocsTeach in our Tech for Teachers entry on the website.

Picturing America

Date Published
Image
Picturing America homepage, NEH
Article Body

The Picturing America website, created by the National Endowment for the Humanities, presents 27 iconic images in American history designed specifically to encourage educators to use images as primary source documents in the classroom. The images range in time from 17th-century depictions of the Catholic mission in San Antonio to the contemporary art of Washington, DC native Martin Puryear.

The printed materials are no longer available, but you can read more about the online resources here.

Women of World War II Anonymous (not verified) Fri, 10/29/2010 - 12:36
Image
Poster, date unknown (World War II)
Annotation

In 1943, at the peak of World War II, the United States military inaugurated the Women Airforce Service Pilots, or WASP, program. The program was designed to bring women pilots into the Air Force in light of the growing shortage of male pilots. More than 1,000 women served in non-combat positions, and eventually flew more than 60 million miles for the war effort. In March 2010, these women received the Congressional gold medal, among the highest civilian honors for courage, service, and dedication.

This website presents more than 250 photographs of women in the service during World War II, including 30 of the WASPs. The Women's Army Corp (WACS), Coast Guard SPARS, Navy WAVES (Women Accepted for Volunteer Emergency Service), Army nurses, and women Marines are also included. There are photographs of nine "notable women," such as Jacqueline Cochran, the founder of the WASPs program, and Lieutenant JG Harriet Ida Pickens and Ensign Frances Wills, the Navy's first African American WAVES officers.

Accompanying these photographs is a selection of close to 100 recruiting posters targeted at women. While other websites document the role of women during World War II, this website stands as one of the largest repositories of contemporary photographs of their military efforts.

Travel Grants for Jefferson-related Projects

Description

These grants fund travel for scholars and teachers wishing to make short-term visits to Monticello to pursue research or educational projects related to Jefferson.

Sponsoring Organization
Thomas Jefferson Foundation
Application Deadline
Award Amount
Not specified

Teaching with Artwork

Date Published
Image
Photo, The Midnight Ride of Paul Revere, July 15, 2008, IslesPunkFan, Flickr
Article Body

What first comes to mind when you hear the phrase "primary sources?" Famous documents such as the Declaration of Independence? Newspaper articles reporting on Pearl Harbor? Letters from soldiers during the Civil War? Maybe you think of visual sources—antique maps or Lewis Hine photographs.

But what about artwork? What does a 1796 portrait of George Washington tell us—about the man, about the time, about the artist? What does an 1851 painting of Washington crossing the Delaware say? It can't be a primary source for the actual crossing, but what information does it convey about American mythology and historical understanding? What information can students bring away from a piece of art?

Like all primary sources, artwork offers unique opportunities and pitfalls when introduced to the classroom. Carolyn Halpin-Healy, of the Metropolitan Museum of Art, suggests seven steps students (and their teachers) should take when approaching art. After processing their initial emotional reactions and describing what they see, students move on to considering the art's original context and historical connections. They then reassess the piece using their new, fuller understanding.

For a sense of this process—though not a full exploration—watch professor David Jaffee analyze two 19th-century artworks, a family portrait and a popular print.

Interested in trying out this approach for yourself? For a ready-to-run lesson, EDSITEment's "Midnight Ride of Paul Revere: Fact, Fiction, and Artistic License" guides high school students in interpreting a 1931 painting of Paul Revere's ride.

If you have the time and resources for a field trip, search Teachinghistory.org's Historic Sites and Museums database for museums where students can examine art in person. Also consider contacting local museums about professional development opportunities—they may offer pre-trip orientations for teachers or workshops focusing on teaching with art.

If you can't take your students to the art, bring the art to them. The Internet hosts a wealth of virtual collections from museums across the country (and the world). Wherever you live, your students can draw on the resources of the
National Portrait Gallery
or the Smithsonian American Art Museum. A keyword search for "art" in Teachinghistory.org's Website Reviews brings up more than 150 archives and exhibits, free to access online.

And for suggestions of even more resources, see how our co-director, Daisy Martin, answers the question, "What resources or techniques would you recommend for teaching using art and its analysis in the social studies/U.S. history classroom?" in Ask a Master Teacher.

Film Series for Educators: Journey to Freedom

Description

From the Facing History and Ourselves website:

"This film [Journey to Freedom] tells the story of Waitstill Sharp, a Unitarian minister from Massachusetts, and his wife Martha, a social worker, who helped feed and shelter thousands of refugees and assisted anti-Nazi dissidents and Jews as they escaped to safety, first in Nazi-occupied Czechoslovakia and later in France. The Sharps were recognized as Righteous Among the Nations at Yad Vashem—the highest recognition accorded by the state of Israel to non-Jews who risked their lives to save Jews during the World War II. The Sharps' compelling story reveals a largely unknown chapter of Holocaust history and provides a new perspective on America's relationship to it. This film is an important addition to Facing History's collection of classroom resources that focus on rescue and resistance during the Holocaust. The Facing History Film Series is presented in partnership with the Denver Film Society.

The workshop is in two parts. Part 1 (4:30-6:30 pm) will be an educator workshop focused on pedagogy. Part 2 (7:00-9:00 pm) will include the film presentation. A light dinner will be served between the two parts."

Contact name
Karen Mortimer
Sponsoring Organization
Facing History and Ourselves
Target Audience
K-12
Start Date
Cost
Free
Duration
Four and a half hours

The Civil Rights Movement in Context

Description

"Too often, our students view Civil Rights in isolation—they don't understand the rich historical background of African American history or the legacies of the movement in the more recent past. They know the major civil rights figures like Martin Luther King, Jr. or Rosa Parks, but they don't grasp the complexities of civil rights leadership, or the experience of the movement's foot soldiers—the students in SNCC, the freedom riders, or the everyday people who marched, boycotted, protested, and volunteered to make the movement happen. This course will try to explore the movement from all of these perspectives using, where possible, first-hand accounts from the people who lived this important history.

The instructor will assume that the main historical outlines of the movement are familiar to K-12 teachers—instead of recounting that basic history, we'll spend much of our time delving into lesser-studied events of the movement and the primary sources that will allow us to explore our own ideas about the movement and its meanings in detail.

The best way to learn history is by doing history. This course will allow for the opportunity for deep historical analysis and interpretation using primary sources. We'll tackle documents, images, newspaper accounts, artistic expressions, film, and other sources. By doing so, we'll develop our own arguments and ideas about the movement, and help our future students do the same. Many of the resources we will use have been recently added to the Internet and they should be exciting additions to the course, and to historical scholarship more broadly. As you mine these sources, you'll hopefully enjoy the historical process and also get some great ideas for classroom activities for your students.

The instructor has selected websites and multimedia resources that will give participating teachers access to literally thousands of documents including newspaper accounts, oral history interviews, government documents, photographs, works of art, film clips, and more. As a participant, you will have the opportunity to analyze these sources through engaging activities to create a lesson plan for classroom use; to receive individualized, constructive feedback and answers to content-oriented questions from a well-versed instructor; and to join other teachers from across the state in lively online discussions throughout the course—all on your own schedule from home or from your school's computers."

Sponsoring Organization
Learn NC
Target Audience
PreK-12
Start Date
Cost
$225
Course Credit
3.0 CEUs
Duration
Eight weeks
End Date