My Lai Massacre Political Cartoon
Professor Meredith Lair examines a 1971 political cartoon and what it says about U.S. reaction to the My Lai Massacre and the trial of Lt. Willam Calley. She also looks at how important photographs were in proving that the Massacre happened, and at the conflicting information offered by primary sources.
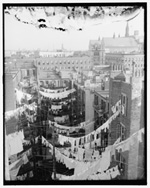
This is an editorial cartoon by Paul Conrad that ran in the Los Angeles Times and was picked up by a lot of other newspapers. And the image itself was in reaction to a particular moment in history when Lieutenant William Calley—who was on trial for war crimes committed in March of 1968—was convicted and sentenced. There was a great deal of public reaction of varying kinds at the time and this cartoon was as much a reaction to the verdict as it was to the reaction to the verdict.
People sent hundreds of thousands of letters and telegrams to the White House, 99 percent of them demanding his release. What Paul Conrad is drawing here is that reaction: the cheering, the yelling, the flag waving. At the top of the ditch represents that swell of sentiment, that Calley was this hero and he was being scapegoated unfairly. You see mostly male figures and they seem to be wearing suits. And there are two signs evident. One says "We're With You, Lt. Calley." The other says, "Well done, Lt. Calley."
The caption is "The My Lai Ditch Claims Another Victim." It references the event of My Lai itself. And the ditch in My Lai was one of the most searing moments of the massacre. Conrad is clearly saying that the United States lost something very dear in that moment.
What appealed to me and caught my eye initially was that he was not just targeting some narrow facet of this story, but was literally attacking the American sense of conscience, and the American sense of what is right and what is wrong. Everything that American soldiers are supposed to be fighting and protecting is gone.
A turning point in the Vietnam War took place in January or February of 1968 with the Tet Offensive. Anti-war sentiment in the United States was swelling in late 1967 and to try and keep a lid on opposition sentiment, President Johnson and his administration embarked on a kind of pep talk campaign for the American people. The message to the American people was that we've almost got the communists licked and this war is almost over.
The enemy in fact was laying in wait and so January 31st, 1968, the North Vietnamese and their Vietcong allies launched a massive, country-wide assault on both American and South Vietnamese military and government installations. And the hope of the enemy with this offensive was that the people would join them and rise up, a mass uprising to evict what they saw as this American invader in their country.
So, the American people, having just been told that the war is almost over, are now treated on the nightly news to images of fighting in the American embassy compound in Saigon, to images of great carnage at the Marine Base at Queshan, at the imperial city of Hue. People are thinking, this war is not over. We've been lied to. We've been had. And public opinion started to tank.
In Vietnam, this really unnerved American soldiers. And the knowledge that the enemy had been able to orchestrate this offensive without any awareness on the part of the United States was deeply disturbing to soldiers who were trusting that the guys in charge know what they're doing.
They were enduring very harsh conditions in terms of rain and mud and sleeping outside and not eating hot meals. And they were experiencing casualties, but not casualties due to enemy engagement. They were getting picked off by snipers or by booby traps or by injuries. And there's a great sense of frustration that they can't find the enemy. They don't have anybody to blame.
The 1st Platoon, and perhaps the company as a whole, were not particularly well led. There's evidence from February 1968 of a breakdown in discipline. But what we see of Charlie Company in the month of February, in the early weeks of March 1968, is a group of soldiers starting to unravel. So when they were charged with this operation to go into My Lai, which the military referred to as "Pinkville," tensions were very, very high.
Vietnamese villages are complexes of little hamlets and this village was, to the Vietnamese, known as Song My. My Lai was just one of several hamlets in Song My village.
In fact, everyone agrees that the first shots fired at My Lai were against an old man who was farming when the helicopters came in. He waved at them and they shot him. The fog of war is often invoked for what came after that. Maybe some soldiers heard shots and interpreted that as enemy fire. But they basically moved the 150 meters from the landing zone into the village and continued firing at any Vietnamese person they saw.
At one point, a large group of civilians was gathered into the irrigation ditch, about 170 people. Calley told them, told some of his soldiers to "take care of them." So these guys are standing there watching these villagers, and Calley came back after a while and said, "I thought I told you to take care of them," and they said, "We're watching them, we're guarding them." And he said, "No, I meant kill them."
There was one instance where a helicopter landed and interceded. There was a helicopter piloted by a man named Hugh Thompson and he had a good view of what was going on underneath him. And he saw American soldiers shooting at women and children and he landed near the ditch and put his ship in between American guns and Vietnamese civilians. He managed to pick up around 20 people and loaded them on his helicopter and carried them to safety.
Any soldier who was there that day would have had the ability to write a complaint or to let someone in authority know what had happened. Hugh Thompson was the only one who did. He spoke with his chaplain with the understanding that the chaplain would follow this up the chain of command. The chaplain in this case dropped the ball and didn't pursue it.
Thompson also spoke with Colonel Henderson, Lieutenant Colonel Barker's superior officer, and nothing official was done about the accusations. In fact, there was a great deal of effort to cover up what had happened. The official report sent up the chain of command said that 128 enemy combatants had been killed in combat at My Lai and that three weapons had been captured.
The person who actually made the effort to tell the story wasn't even there. There was a soldier named Ron Ridenhour who was serving in Vietnam. He was not in Taskforce Barker. He had nothing to do with the incident at My Lai in March 1968.
Ridenhour was really troubled by it and so he started to seek out other men from the company to find out what happened. As a result of his own informal investigation, he starts to hear that the first guy's story is being corroborated down to the finest details.
And so in March of 1969, he writes a letter to his congressman who had just come out against the war. And he also sends copies of the letter to military and government officials, other congressmen, senators, the president, senior officials in the Pentagon. And so in April of 1969, the Army launches a preliminary inquiry.
Details about what Calley did started to come out in November of '69. The rumors were starting to emerge that a massacre had taken place, that perhaps hundreds of Vietnamese civilians had been killed by American soldiers. And I think people didn't want to believe that it was true.
Anything that makes it into Life Magazine is kind of a big deal. And so you're flipping through your Life Magazine, having heard these rumors or read a newspaper article or two about this Calley guy, and suddenly you turn the page and there, in Technicolor, is a pile of bodies. A pile of Vietnamese women and children. There's one photograph in particular that's become iconic of the My Lai massacre and it is of this pile of people in a road. On the top of the pile is a baby, a little, naked baby, with its bottom facing up. It's really hard to understand why the baby needed to be shot.
So the photographs pretty much silenced the naysayers who said this was a rumor. This was definitive proof, vindication for Vietnamese people who knew that this had happened. And it became the biggest story of the day, which is quite an amazing thing given that the war itself was incredibly controversial. Given that atrocities committed by the Vietcong and the North Vietnamese army had recently been unearthed in the city of Hue in Vietnam. It reignited anti-war sentiment. So what ensued then was the release of a lot of detail as the trials were underway and publicized with updates day in and day out. The people who cheered William Calley had seen those photographs and they had seen the interviews with the perpetrators and they had seen interviews with the victims in My Lai. And they had read the testimony in court. They knew what they were cheering.
Eventually, the charges that came down were charges of murder against William Calley. I think he was charged with over a hundred murders because of the incident at the ditch where he ordered his men to kill. And then there actually came a moment where his soldiers refused to continue because there were only children left and Calley took one of their rifles and "finished the job."
Calley's trial drew a tremendous focus and part of it was because of the defense that he used. He did not deny that he had done these things. In fact, he testified rather proudly about his conduct at My Lai. The Army law is the Uniform Code of Military Justice, says that soldiers have to follow orders and if in a combat or a wartime situation, they don't follow orders, that is a treasonable offense. So the defense went something like this: Calley was given these orders and under penalty of being shot or being prosecuted, he had to follow through. But the Uniform Code of Military Justice says that soldiers are not under any obligation to follow unlawful orders. So the question then becomes whether or not Calley and his men understood that the orders to kill unarmed civilians, women and children, were unlawful.
When I've used images like this or images of propaganda, I have them just work through the story. I think students sometimes are reluctant to just tell a narrative, where they think that somehow they're supposed to be offering some incredibly complicated insight. And, so, if you just have students answer the question, what is going on here, what do you see, they can collectively start to put it together. I see people about to fall off a cliff, or people celebrating.
He gives us this maw in the ground, this sense of divide, that there's one figure on one side and that there's another group of people on another side. They will, I think, arrive, at some sense of division, and that's a great starting point for understanding what happened to the American public during the Vietnam War.
There are clues that Conrad gives us. "The My Lai ditch claims another victim," so obviously this space that he's drawing represents the My Lai ditch. It's not any ordinary ditch. It's this iconic image of the 20th century, and Lt. Calley, his name as well is spelled out. He is not an anonymous person.
I would look at an image like this as a starting place and as a launching point to get students interested in a really complicated story. You can engage so many facets of the Vietnam War, you can talk about the actual incident at My Lai, you can talk about the trial, public reaction to the trial.
The image of the ditch and the incident at My Lai lends itself to a discussion of American strategy there, but I think what it ultimately arrives at is questions of the ethics, of who's responsible and which version of the story American wants to claim. And if students are conflicted I think that's okay. Anyone who has too definitive a perspective on My Lai isn't really paying attention.
I think Conrad would agree with me because he's targeting not the people who are confused, he's not criticizing the people who are sorting through, he's criticizing the people who are cheering and celebrating and are taking this singular one-sided view of the event.