Laura Jernegan: Girl on a Whaleship

Image
Annotation

In 1868, Laura Jernegan, six-year-old daughter of a whaling captain, put to sea with her parents and younger brother. This website, created by the Martha's Vineyard Museum, explores her family's four-year whaling expedition, focusing on Laura's own diary.

Two narratives ground the exhibit: "The Story of Whaling" and "Laura's Story." Each narrative is divided up into three sections—"Before the Voyage," "The Voyage" and "After the Voyage"—and consists of 14—15 individual "chapters," each a short essay of approximately 300—1600 words. "The Story of Whaling" describes the rise and fall of the whaling industry and the nature of a whaling voyage, including preparation and hiring crew.

"Laura's Story" narrates the voyage of the Roman, the ship on which Laura and her family set sail. The voyage included a stay in Hawaii, mutiny, and the Roman's sinking in the Arctic (everyone survived). "Laura's Story" also looks at the lives of Laura and her family before and after the voyage, as young children and as adults. Each essay include links to images, descriptions, and other sections of the website that clarify and enrich the text.

For Laura's own description of her time at sea, "Explore Laura's Journal" lets visitors browse her 43-page journal. Written in a child's bold handwriting, the journal is short and easy to read, and can be viewed in the original scans, as a text transcript, or with a magic lens feature that translates the writing into print as the mouse runs over a page.

Further background information supports the two narratives and Laura's journal, including:

  • "About Whales," a mini-exhibit answering basic questions about six whale species;
  • an interactive timeline reaching from 1774 to 1955, including both general world history events and whaling events;
  • "Explore the Ship," a diagram of a whaling ship that visitors can click for information on crew positions and parts of the ship; and
  • a "Map of Whaling."

This interactive world map lets visitors display features from six sets of information, turning each set on or off and overlaying them. The sets include the four routes of the Roman's journey, three typical whaling routes, posts and sites important to whaling, 1878 whaling grounds for four species, major ocean currents, and whale migration patterns for three species.

Finally, visitors can view zoomable photographs of 175 different whaling-related objects in "Artifacts," read the descriptions of 15 crew positions in "Meet the Crew," and browse 16 pieces of logbook art, 36 photos, and 53 whaling-related images in the "Picture Gallery." An A-to-Z glossary offers definitions for 180 historical and whaling terms. Visitors can also explore the biographies of five people, including all of the members of the Jernegan family and, in "More About," can read 10 more 1,000-3,000-word essays on subjects like race and whaling, women and whaling, and 19th-century children's literature.

In the "For Teachers" section, educators can download two units on whaling: a four-lesson unit for grades 1–3, or a six-lesson unit for 4–5. "For Further Study" features a bibliography of 75 books for children and adults and eight annotated links.

A thorough website centered around a very unique primary source—use it to invite young children into history through the voice of a peer!

Mystery Strategy for Elementary Students

Image
Article Body
What Is It?

Using the premise of a mystery to solve, elementary students act as history detectives as they explore a historical question and analyze carefully chosen clues to formulate and test hypotheses.

Rationale

This strategy depends on our need to solve mysteries. Students are given an opportunity to be active learners as they solve a historical mystery. This strategy relates to what historians do and the process of historical inquiry. Students must work with evidence, form hypotheses, test those hypotheses, and report their findings.

Goals

The goals of the mystery strategy are to learn to: 1. gather, organize, and process information; 2. formulate and test hypotheses; 3. think creatively and analytically to solve problems; and 4. develop, defend, and present solutions to problems.

Teacher Preparation

1. Choose an topic that contains a mystery such as “Why did the American beaver almost become extinct in the 1840s?” Other examples of appropriate historical mysteries include: “How did flooding in Mississippi in 1931 hinder the Civil Rights Movement?”; “Who really invented the cotton gin?”; and “Was the Boston Massacre really a massacre?”

Data should tease the student without revealing too much.

2. Gather primary and secondary sources that will serve as clues for students such as letters, diary entries, maps, statistical tables, political cartoons, images, artifacts for students to touch (in this case beaver fur or felt), and web articles. These sources should pique students’ interest and provide them with clues that will help them generate theories. For example, if students are given a clue regarding the habitat and species characteristics of the beaver and then also told John Jacob Astor was the wealthiest man in America in 1848 it is hoped they conclude that Astor’s wealth had something to do with the beaver. Maps indicating trade routes should confirm this conclusion. Though they may be encountering names in the clues for the first time, making educated guesses is an essential ingredient to the mystery strategy. Students should not be afraid of making guesses or presenting ideas to the larger group. The learning goal is about what it takes to arrive at a hypothesis rather than ending up with a right answer. 3. Decide student grouping. If using small groups, keep individual needs in mind such as reading levels, ability to work with others, and Individual Education Plans (IEPs). 4. Decide how to present the clues to students (strips of paper within envelopes at stations, single sheets of paper for them to cut apart, etc.). See examples of clues for additional clues. Teachers should read through materials to pull clues that fit students’ needs and abilities.

In the Classroom

1. Students read through clues and sort them according to common elements. Once the clues are sorted, students begin to work on their hypothesis. 2. As students analyze the clues and arrive at a hypothesis, use guiding questions such as, “Tell me how the two things relate” and “What’s your reason for thinking that?” to keep students focused on solving the mystery. Avoid guiding them in a direction. The goal is for students to work with the clues and arrive at their own hypothesis. Students can use the Mystery Writing Guide Worksheet to record ideas. 3. In a whole group, have small groups share their hypotheses and evaluate them. Are they logical based on the clues? Do they make sense? Write group responses on the board so students can track their findings as they move through the evidence. The goal is to test each group hypothesis and arrive at the best conclusion. For example, if one group understands there is a connection between the mountain men and the beaver yet they also think the railroads had a role in the problem, do the clues support or refute these ideas? Remind students they are like historians looking at information to form a hypothesis, test it, and arrive at a conclusion.

Students are asked to think about the process of historical inquiry and how it relates to the steps they followed to arrive at a hypothesis

4. Assign each student a written reflection piece on the content learned and the process used to uncover the mystery. This is the most important part of the mystery strategy and should go beyond merely reporting content. Prompt students with questions such as: What happened in the activity? What things did you do well? Most importantly, ask, Which hypothesis best answers the mystery question? Why?

Common Pitfalls
  • Data should tease the student without revealing too much.
  • Data should hone inference skills.
  • Clues should provide information not an explanation (see Mystery Strategy Clues Worksheet).
Example

Students are presented with the following problem: Why did the American beaver almost become extinct in 1840? Write the question on the board so it is visible throughout the activity. Anticipatory Set: Begin by employing a student’s knowledge of science and ecosystems learned earlier. Give a short presentation about the American Beaver. This would include the fact that beavers maintain dams that create ponds. The water level in these ponds is constant, encouraging the growth of vegetation that supports many other types of animals. The dams also keep summer rains and resulting erosion in check. The presentation could end with figures about the number of beavers estimated to be in North America from European settlement to today (see links below). Students would see a significant decline in the population during exploration and settlement. This decline leads students to the essential question and they can begin working with the clues to make hypotheses. Clues: Clues can be obtained from….

  • images from fashion catalogs from the mid-1800s;
  • real beaver pelt and/or beaver trap, scraps of commercial felt, or images of    beaver fur and hats;
  • short biographical sketches of mountain men such as Kit Carson, John    Liver-Eating Johnston, and William Sublette;
  • Advertisements for beaver products such as top hats and ads from trading    companies seeking hunters. Scroll down through each page for the    aforementioned images.
  • newspaper accounts regarding skirmishes/battles between the Iroquois    Confederation/other tribes in the Great Lakes region in the Beaver Wars;
  • Quotes from all parties involved in the fur trade (Native American chiefs,    trading company owners such as Manuel Lisa, mountain men, etc.)
  • Pictures of people wearing beaver hats;
  • John Jacob Astor.

Be sure to use some visuals! Reflection: Students reflect on the original question by presenting their hypotheses in written form. Along with their response about the disappearance of the beaver, students are asked to think about the process of historical inquiry and how it relates to the steps they followed to arrive at a hypothesis.

Bibliography

American Beavers. Silver, Harvey.F., et. al. Teaching styles & strategies. Trenton, NJ: The Thoughtful Education Press, 1996.

Civil War Photos: What Do You See?

Teaser

Analysis of photographs of Civil War artillery broadens students understanding of the American Industrial period.

lesson_image
Description

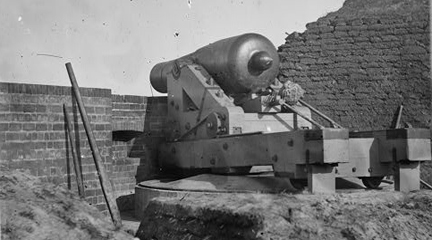
This lesson guides students through close analysis of a photograph of a piece of Civil War artillery as a means of better understanding the relationship between the Civil War and industrialization.

Article Body

This lesson provides an excellent opportunity to teach students how to analyze historical photographs. Focusing on one photograph of a piece of Civil War artillery (though making use of a variety of other images), the lesson guides students step by step in carefully analyzing various elements of the photograph. Different portions of the image are isolated, and students answer questions about details in that portion of the image. Some questions may be difficult for students, and even teachers, to answer on their own, but answers to the questions are provided. This portion of the process would be a great opportunity for teachers to encourage students to make educated guesses in response to the more difficult questions before checking their answers.

While the lesson focuses on one particular photograph, it includes a remarkably useful collection of Civil War photographs to provide context for the featured image. We especially like the encouragement given students to re-evaluate their conclusions about the first image after looking at subsequent pictures. Openness to new evidence and new conclusions is an attitude that is important for students of history to maintain.

In addition to being a great lesson for teaching close analysis, this lesson also provides an excellent link between a single source and a much larger theme. It bridges two important topics in American history—the Civil War and Industrialization. The lesson concludes with a class discussion surrounding a set of questions about how the process of industrialization influenced the way in which the Civil War was waged. So often in our classrooms, historical events and themes turn into discrete, isolated units; this lesson provides a valuable reminder that all of the periods and events we study are interconnected: students have the opportunity to see how industrialization influenced the process and outcome of the war, and perhaps even how the war in many ways drove industrialization.

Topic
Links between Civil War and Industrial Revolution
Time Estimate
1 to 2 class sessions
flexibility_scale
5
Rubric_Content_Accurate_Scholarship

Yes

Rubric_Content_Historical_Background

Yes
In addition to providing answers to specific questions about the photograph, the lesson includes both text and additional photographs to help place the featured photograph in context.

Rubric_Content_Read_Write

Yes
While no specific writing requirement is included, the questions about the photograph, as well as the discussion questions, can be used as writing prompts.

Rubric_Analytical_Construct_Interpretations

Yes

Rubric_Analytical_Close_Reading_Sourcing

Yes
There is only minimal reading with the lesson, but the process does require close analysis of photographic sources.

Rubric_Scaffolding_Appropriate

Yes

Rubric_Scaffolding_Supports_Historical_Thinking

Yes
The featured photograph is broken down into multiple sections, with built-in questions to guide students through analysis of each section.

Rubric_Structure_Assessment

No
While possible assessment strategies are mentioned, no specific assessment tools or assessment criteria are included. Wrap-up discussion questions used as writing prompts, however, would provide a useful assessment of student understanding.

Rubric_Structure_Realistic

Yes

Rubric_Structure_Learning_Goals

Yes

Students Working in Local Historic Preservation

Image
Article Body
What Is It?

History comes alive when students volunteer at their local historical society museum and they learn the art and value of historical preservation. This service-learning project bridges the needs of a museum that was understaffed with the opportunity for students to practice being historians.

Rationale

Every community across America has a story to tell through its architecture, its people, its use of space, its resources, and its role in the larger American narrative. Our town has a rich history that dates back to the colonial period and like many small towns, we have a historical society with a museum that houses a rich collection of historical documents and artifacts that tell the story of our past. However, because of limited funds, a lack of proper materials for preserving items of historical value, and few volunteers, we were in danger of losing much of this collection. As a history teacher I’m always searching for ways to make the study of history relevant to my students. Providing them with an opportunity to volunteer at the museum seemed like a perfect way to marry the interests of our local community with my objectives as a history teacher. I hoped that through this experience my students would develop greater appreciation for preserving history and an understanding of the methods used in historical preservation. This partnership could also help bring the museum into the 21st century by creating a database of the museum’s collection that could be shared with the public and school groups. In addition it would give students a glimpse into the work of historians, preservationists, archivists, and archaeologists.

Description
As a history teacher I’m always searching for ways to make the study of history relevant to my students

I contacted the director of the historical society museum to discuss the possibility of using students in the museum to help with their work. The staff was cautiously optimistic, though concerned about adolescents working with valuable documents. When they agreed, I asked four of my capable, dedicated students who had expressed an interest in this work to help me launch the program. Each year I have added students to the group and currently 14 students work one to two hours weekly under the supervision of a volunteer museum staff member. It has been rewarding to observe my students doing work of great value, and it provides the museum with the work it needs to give the community a glimpse into their past.

Teacher Preparation/Procedure

1. Contact your local historical society or museum and ask what opportunities are available for your students. I made an initial phone call to introduce myself and to ask about possible projects. I then visited the museum to meet the director and to work out details of the project. 2. Determine the interest level of your students. Students are always looking for ways to improve their chances at college acceptance. This opportunity was intriguing because of its uniqueness and because it would provide them with community service hours that many need for scouting, National Honor Society, or just because they want to be more involved. I also introduce them to the value of historic preservation and help them to recognize the community need to preserve the artifacts and documents housed in our museum. 3. Get approval from school administrators. 4. Provide students with permission slips to be completed by their parents. 5. Conduct an orientation meeting for students and museum workers. This is held at the historical society museum and the museum staff introduces the students to the workplace and discusses the type of projects they will work on. A survey form is provided to the students to gauge their interest and availability. 6. Create a schedule for volunteers indicating dates and hours they are expected to work. I post this in my classroom so that I know who is working on a daily basis. I also maintain an email chain that is shared with the museum staff. 7. Students must have transportation to and from the museum. Students in my district are bused so they are able to use the school buses to get to the museum after school. Parents must provide transportation home. 8. Visit the museum periodically when students are working to encourage them and see their progress. I volunteer one day a week myself and work along with the students, although this is certainly not necessary for the program to be successful. 9. At the end of the season, the museum hosted a special presentation for students, parents, and school administrators to showcase the work of the volunteers. It included a PowerPoint presentation featuring each student and the work that he/she accomplished. This was a wonderful celebration to demonstrate the students’ accomplishments and efforts. 10. Contact your local newspapers to advertise what students have done for the community. This will go a long way in getting support for your efforts and in encouraging more students to participate.

Pitfalls
  • Be sure the students understand the seriousness of their work and the importance of honoring their commitments. You may want to wait for the school year to be underway before beginning. We actually begin in January and end in May. By then I know my students better and can determine who is best suited for the program.
  • We volunteer during two different sports seasons so the group I begin with may not be the group I end with. Be open to substituting students over time. I don’t turn anyone away even if they cannot commit to the entire program.
  • Students should discuss carpools and transportation issues.
  • Have a phone/email chain for messages and communication.
  • Inclement weather and vacation schedules should be discussed.
Be sure the students understand the seriousness of their work and the importance of honoring their commitments
Additional Resources for Teachers

National Trust for Historic Preservation This site provides teachers with a rationale for teaching historic preservation and a series of articles and model lesson plans that can be incorporated into K-12 classrooms. The focus is on teaching students the value of preservation and to provide them with opportunities to be actively involved in the history of their community through preservation projects. Examples of articles range from how to conduct oral histories to how to “adopt” a historic site. Advisory Council on Historic Preservation A step-by-step approach to describe what a historic preservation service learning project looks like. The Advisory Council on Historic Preservation, in concert with the Preserve America Foundation, is committed to encouraging students to take on service learning projects that will enhance their understanding of American history and allow them to gain a greater appreciation for preservation efforts. The site also includes articles highlighting the commitment of our President and First Lady in recognizing the contributions of citizens who effectively engage in historic preservation projects. National Council for Preservation Education Guide to undergraduate programs in preservation. Teachers and guidance counselors might find this helpful in advising students who have a particular interest in historic preservation programs. Teaching with Historic Places Provides teachers with lesson plans that focus on students acting as historians as they learn about sites that are listed on the National Registry of Historic Places. The lesson plans are categorized by state, theme, time period, and skills. The intent is that students will learn history in a more active way and come to appreciate our nation’s cultural resources.

Acknowledgments

A special thank you to the members of the local historical society who have patiently guided my students in the art of preservation and provided us with a firsthand opportunity to learn history.